Send any questions or comments to the designer Roger Caffin
The packs I have described here are very lightweight. I have made and sold some, but at present have ceased production. Things may change. They involve precision designs and superb materials, but if you want to treat them brutally they will suffer damage, and fail at an embarrassing time. (So what's new?) I accept no responsibility for what you make or what you do with them. Treat them with care and maintain them with care, and I believe they should last a long time.
I spent some time in the main Packs section discussing the ergonomics of load carrying, and how most of the packs made in Australia over the last 40 years have been based on seriously faulty concepts. Any design which puts the load low down near your waist is going to make you lean forward too far to get balance, and it will give you a sore back. The original purpose of those packs with big bottom ends was for serious mountaineering and climbing when you don't want the weight up near your arms. Equally, the whole idea of transferring the load to your hips is flawed. By doing this you make a direct connection between the load and your hip joints, maximising any jarring in your hips, knees and ankles which may occur. For women, whose hips move more than men, the idea becomes even more silly.
Peasants around the world found out a long time ago that the way to carry a large load, even over rough ground, is to get that load up high. Farmers in Europe carry huge loads of hay down the mountains in conical wicker baskets hung on hooks on their shoulders; porters in Nepal carry either trekkers' gear or trade goods over the Himalayas on their shoulders and with head bands; Africans carry loads on their heads. All these illustrate this. A high load stops you having to bend at the waist, and cuts out the aching backs. It also allows your spine to act as a natural flexible shock absorber, eliminating jarring. With a little care in design, you can also get the load far closer to your back or spine than is possible with those round-bodied bags which stick way out from your back. A pack designer in NZ by the name of Aarn has an excellent web site on this, with some good illustrations of how close you can get a load to your back. Some of the ultralight packs from America are little more than round stuff sacks spaced out from your back on several layers of foam mat: light, but not ergonomic!

In the Packs page I mentioned the basic idea of the H-frame as it should be done. This is illustrated to the left with a CAD drawing of a very lightweight H-frame (quite different from the old Mountain Mule). It is actually made of Easton 7075 high tensile aluminium tubing, very similar to the standard tent poles, and weighs about 150 grams. Actual dimensions could vary according to the size of the wearer - one size does not fit all! I made mine 320 mm between centres for the uprights, with a radius of curvature of about 350 mm for the horizontal bars, and a frame height of 580 mm. Despite its light weight it is quite capable of carrying a full load of 20 kg, although I do not carry that sort of load any more. Mind you, if you throw it out of a moving car or try to use it as a ladder you would probably manage to destroy it. The ultimate absurdity must be the way Backpacker magazine 'tested' some packs late in 2009: they towed a range of filled packs behind an SUV for some distance. Stark raving bonkers.

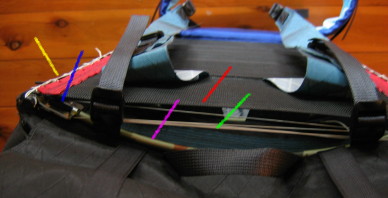
The next thing a frame needs is a means of keeping it off your back. You would not want the bars rubbing against your spine for instance. This is provided by a 'web' (red pointer) across the frame as shown in the picture to the right. This web is tensioned against the spring of the curved horizontal tubes (purple pointers) to provide some degree of dynamic suspension. By making the web out of a special high-strength netting (Leno lockmesh is suitable) we also get lots of circulation for hot days. The netting has to be essentially non-stretch in itself: the dynamics comes from the curved horizontal tubes. This means that many knitted meshes are not really suitable - they are too stretchy and inclined to distort in shape under tension. The netting is laced onto the frame at the back of the frame: you can see the zigzagging white string (green pointers) in the picture. I use 1 mm stainless steel wire as a reinforcing down the edges of the mesh fabric to keep the edges straight, and this wire helps to distribute the load from the point contacts made by the string.
Then we need a means of attaching the frame to your back: this is done with the shoulder straps. They come from within the frame behind your neck, so to speak, and go down to the bottom corners of the frame. What is not so visible is the anchorage for the top of the shoulder straps: this is out of sight between the frame and the bag. There are lengths of webbing going from the top of the shoulder straps, behind one of the horizontal tubes, and down to the bottom corners of the frame. The load is not connected directly to the middle of one of the curved tubes. This arrangement places most of the load onto the bottom of the uprights rather than the curved tubes and the joiners at the junctions: a far stronger approach. There are also 'balance straps' going from the top of the shoulder straps to the top of the pack - the body of the pack, not the frame. These prevent the top of the pack from leaning backwards, away from your back. In essence, they help keep the load close to your back. There is also a wide waist belt, although this is not entirely necessary with this design. I have carried the pack without doing it up on level tracks. It does help to stop the bottom of the pack from moving when covering rough ground.
Some makers of conventional internqal frqame packs extol the extra padding and even heavy stiffening they put in the dorsal region of the waist strap. In some cases this works; in other cases it seems to be an attempt to alleviate the poor initial design of the frame or harness. Some internal frame packs are so poorly designed and balanced that transferring part of the load to the hips may actually be actually an improvement. Some of the bad designs seem to be trying to sit the load on your backside, or the base of your spine. For males this is (fortunately) not going to be very successful, otherwise you would be thumping your spine and hip joints there. The better idea is to transfer the load to your hip bones or pelvic cradle, but this has to be done with sonme care. Done badly it can put quite high pressure on the points of your hips bones, and cause permanent damage there. That's not smart. For females the wrong sort of harness or hip belt can be counter-productive as the female backside has the gluteal muscles going outside the pelvic cradle, and the dorsal pad can, if wrongly designed, simply bear on that very hard-working muscle.
What we have found is that females usually need a slightly different harness design from males, due to the differences in hip shape. This usually translates to their needing a slightly more solid harness, which can be slightly heavier. Most unfortunate. Females need to be especially careful about keeping the weight of their packs down.
Actually, the whole concept of hip loading is unneccesary with a good H-frame design, and the conventional waist belt oftens ends up very heavy to boot. As I said above, you can happily carry an H-frame with no waist strap at all, although it does help to prevent sway. However, I have also found that many people, especially females, don't seem to be able to carry an H-frame very successfully. But it works for me.

Actually, you do not have to have a bag at all with an H-frame. I have seen people put all their gear into stuff-sacks and tie those sacks onto the frame. This works especially well when the bottom of the frame curves out to make a platform. However, the thought of going through our scrub with my gear just in a collection of stuff sacks does not appeal. Then there is a company in America which sells tubular 'bags' to place across such a frame. The idea here is that each tube can contain a steel (plastic, carbon fibre, whatever) bear-proof drum. In some parts of America these are required, by law, to stop bears from getting used to ripping open packs and eating all the peanuts and chocolate. Seriously! However, I chose to have a more conventional 'bag' on my frame.
There are two main designs for a good H-frame bag: one compartment and two-compartment. There are advantages and disadvantages to each design. If you have a separate bottom compartment you can put your tent and parka in there, and it does not really matter whether they are wet or dry. There is nothing below them, so any water which squeezes out from them cannot wet the rest of your gear. In addition, having them there means you do not have to open your pack to get a parka out in bad weather. Caution: despoite what you may read in many mass-market advertisements, you do not ever put your sleeping bag in the lower compartment! It will have the greatest chance of getting wet there. Obviously some pack makers have never done any serious walking.
However, having a separate bottom compartment means the main bag (the upper section) is less tall, and for a small light-weight pack this can make it hard to get the tent poles and sleeping mat into the main compartment. They tuern out to be a bit too tall for the remaining space. If you have a single compartment you can always tuck a wet tent under the lid at the last moment and rely on the waterproof throat to keep the water out of the main bag. Well, that assumes a good waterproof throat of course. If you don't trust the throat on your pack, invest in a small square of geuinely waterproof fabric to put over the throat under the tent. Such a suare of fabric has many other uses too.
There is a subsidiary problem with the two-compartment design: if you try to put a conventional heavy bulky tent into the small lower compartment, you may find it will not fit. You need a compact lightweight tent as well! I have made both versions in the past, but I have since converted my 2-compartment packs into 1-compartment versions, and been hapier with the change.

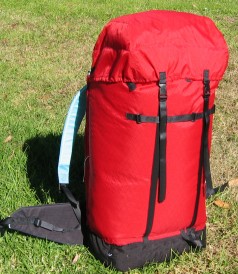
The picture to the left shows the tapered design of another version of the pack: it gets smaller towards the bottom, in complete contrast to the bulging bases you find on most internal frame packs. I find this actually makes the pack easier to get through scrub, and less likely to get in the way when scrambling. The top lid has bungee cord around the edge to keep it tight against the main bag: this makes it shed the rain better. The top does not come off to make a bum-bag: another gimmick idea designed mainly for the hostel/trekker market. There is of course an internal (silnylon) throat to keep the rain out, and a strap across the top to pull the top of the bag in towards the frame. I have found that this strap can also be used to hold a water bladder in place under the top flap, when carrying extra water for a high camp, or it can holds the tent in place. More recent versions of my packs use two top straps instead of a single strap, and I found that works better. Of course, the straps are made of very light webbing.
In the version to the left the fabric is highly waterproof, and all seams on the main bag and lid have been sealed with tape. I am not saying the pack is fully waterproof, but the insides do stay pretty dry under most conditions. This pack has spent a lot of time in Wollemi, travelling along several rivers and over several ranges. It has floated across many pols of water on my back and not let any water in: a most satisfying behaviour. It has worked very well, with the load snug against my back and leaving me with very good balance.

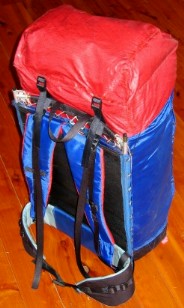
The bag has to be attached to the frame of course. With such a light frame this is best done in a distributed manner. After some grief with a heavy load on one trip I realised that one should not tie the bag to the top bar in the middle as is shown in the picture of the blue bag shown above. Doing this puts a torque on the couplings between the top bar and the uprights which they cannot handle. They were not designed for that: they are meant for holding the horizontal bars in place against the web tension. So the bag is anchored at the top corners (blue pointer, above) and down the sides (yellow pointer, above). The anchors at the corners use webbing, while the distributed anchoring down the sides uses string. Yes, it can be quite strong, especially if it is Spectra. I use a special 'lock-stitch' way of tying the bag to the frame which avoids putting a load on the fabric.
You may recall that both ends of the shoulder straps are connected to the bottom ends of the vertical bars. The weight of the bag is more or less hung from the top end of the vertical bars. This means that the vertical bars are a crucial element in the whole load-bearing design. All the horizontal bars and the webbing across the back do is to keep the vertical bars in the right place relative to my back.
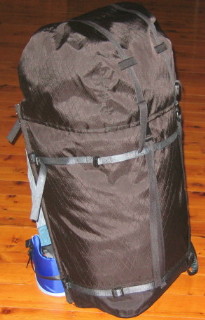
In winter time I need a bit more volume for the larger tent and the extra clothing. So I made a slightly larger version. It is a shade deeper, and shade wider, and a bit higher. Basically it looks the same as the summer pack, and weighs just a little more. I made a red one which weighed 900 g and took it across the Pyrenees for eight weeks, very successfully. Actually, it was a little larger than I needed because the rest of the gear was UL as well. The picture to the right here is of one I made for someone else, in a fabric slightly tougher than than the red or the blue. It weighed about 1000 g. It looks a bit 'stealth' in comparison: you wouldn't want to lose it on a dark night!
I thought about making some plans for the pack available for the DIY enthusiast, but there are problems. Specialised equipment is required to put the curves in the tubing without weakening it. Do it the wrong way and it can snap, just as some tent poles have done. Then there are the little couplings joining the curved tubes to the uprights: the frame does not work without these. They require two custom press-dies to get the required strength. I am not too sure what to suggest here. I will try to find a manufacturer, but they all seem to be scared of ultralightweight gear. It might ruin their 'bombproof gear' (but never mind the weight) reputation.
That said, I did use some cheap aluminium tubing from the local hardware store to make a prototype frame. I switched to the Easton tubing because it is so much lighter, but the cheap tubing did work. I drilled holes into the uprights to socket the curved tubes in. You would have to reinforce the joints, but maybe a little fibreglass could be used.
I have used a range of fabrics for the pack body. Typically I use a multi-layer 500 denier Cordura at 255 grams per square metre (gsm) for the base as it has to withstand a fair bit of abrasion. Such a fabric is normally PU-proofed. You could also use a 1000 denier Cordura at about 350 gsm. You could use the base fabric as a single layer, or you could use it as a reinforcing layer over the full-length main bag. A double layer is getting a bit heavy, but if you are going to be doing a lot of bashing around in rough country and scrambling around rocks it may be worth the extra weight. A double layer also means the Cordura base fabric does not have to be really waterproof.
For the body I have used a fabric as light as 100 gsm, but that particular fabric turned out to be not very abrasion-resistant. It would probably be OK for a pack for track walking, but for scrub-bashing I turned to something with more abrasion resistance: the red stuff shown above at about 180 gsm. For the webbing I used 20 mm wide tape in two weights, at 13.5 g/m and 7 g/m, depending on the wear expected. The heavier stuff is sold as webbing, while the lighter stuff is sometimes sold as a seam binding tape. It does not grip in the buckles quite as well, but is fine for static parts like the straps under the lid. The throat is made of silnylon at 49 gsm.
Some of these fabrics are available from the local or USA sources mentioned in the DIY section. The light PU-proofed 'packcloth' fabrics may stretch a little under load, and this brings the life of the PU-proofing into question. But the proofing has been getting more robust over the years. I have been using the composite X-Pac fabrics in most recent versions: it has a waterproof internal layer and built-in Kevlar thread reinforcing in a diamond pattern. X-Pac comes from Dimension Polyant: quite brilliant totally waterproof multi-layer fabrics. DP will sell cut lengths to the public too. There are no local sources for this fabric yet.
I tried using cheap ('generic') buckles obtained locally, but some of them snapped under load. (I was ski-touring at the time, and this was just a little inconvenient.) I have since bought better brands (Fastex and Duraflex) from OWFINC in America. I started using consumer thread (eg Gutermann) available from local sewing shops, but ended up buying industrial thread (Rasant 120 and rasant 75) from a specialist supplier (over the counter). Some of it is just a little harder to knot than the consumer-grade thread, but it is a bit stronger and runs more smoothly through the machine. For the heavy sewing I bought some bonded nylon thread from an industrial source.
These designs have been under test for many years (written at the end of 2009). A lot of this testing has been done in the Blue Mountains near Sydney and in Wollemi NP to the north of it. The scrub there is fierce, and the cliffs frequent: this was no gentle test period. We bashed scrub, waded down (or swam down) rivers, scrambled up and down cliffs, and even walked a few tracks. The H-frames have worked wonderfully. The very lightest fabric had trouble with abrasion in the Wollemi scrub and rock, but the other fabrics have performed excellently.
I have also taken these packs to Europe for eight weeks' continuous walking on several occasions, in the Pyrenees, across France, and through Switzerland over the Alpine Passes. The packs have survived possibly better than the wearer.
I have taken several of my winter versions ski touring. In 2005 I carried over 25 kg in to a base camp in a winter pack. That's a pretty big load for any pack (or wearer!), but I had no problems. In addition, I carried that load with plain fabric shoulder straps (see the second photo from the top of the page). You just don't need the huge amount of padding some commercial designs have: after all it does not reduce the load on the straps at all.
The only problem I can see with my frame would be if you threw the pack down on the ground on one corner. Do this often enough and the frame would probably develop a twist or damage a coupling. This is, after all, ultralightweight gear, and it requires some degree of care (or common sense) in its use.
The Summer model weighs about 850 g when built out of the reasonably strong materials mentioned above. It seems to have a capacity of about 60 litres, possibly a bit more. But this is by comparison with commercial packs of that volume. Just how they measure the volumes is something you don't want to ask: I question whether the volumes bear any resemblance to metric standards. It could be made lighter by using lighter fabrics, which would be fine if you stay on tracks. I use this pack across Wollemi, in extremely rough country, without any problems.
The Winter model weighs about 900 g when made of the same materials and holds at least 70 litres. The tougher black version weighed about 1000 g. It is more than adequate for ski touring. It has attachment points for XC skis on each side. In 2004 I used this design across the Pyrenees for 8 weeks. In 2005 I used one to carry over 25 kg of gear in to a base camp. Later on ski touring I had a far more reasonable load of about 16 kg.
Early versions of both models had a pocket on the top, but I had some problems with this idea. I found the pockets invariably leaked through the zip, and once water got in it didn't get out. The reason for having a pocket on the top is usually said to be so you can have quick access to some items. I never need access that quick, and things put in the top pocket are very exposed to damage when ducking under branches. A First Aid kit? If you need that, you are going to drop your pack anyhow! I have since switched to using a light 'day bag' for such goodies, and I put this day bag just under the lid. That said, a top pocket can be useful.
Both models have two straps holding the lid down, and one or two straps under the lid holding the throat down. Both models have a silnylon throat of course. I have optimistically put an ice axe loop on each one - it's been used. But there is also a length of webbing around the body for anchoring other things to. I hasten to add that this is not meant for hanging sleeping bags off.
© Roger Caffin 6/6/2002, 26/12/2009