Send any comments to the maintainer Roger Caffin
Do you find that after half an hour some of the straps on your pack are nowhere near the lengths you set them too? Do you find that the webbing seems to slowly slip through the buckles as you walk? Well, there are ways of fixing this, and we detail them here. First we need to distinguish between several sorts of buckles and how they are used.
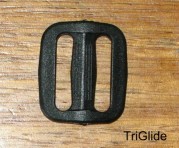
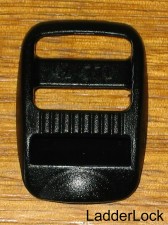
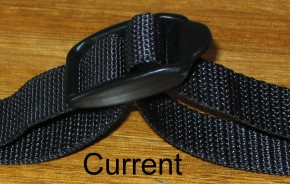
| This is a fixed TriGlide | This is an adjustable LadderLock | A common buckle arrangement looks like this |
|---|---|---|
 |
 |
 |
Yes, some of these LadderLock buckles are known to slip under load. Is it the fault of the webbing or the buckle? Well, it can be either. I will explain.
You will notice that the webbing I have in the picture has pronounced ridges across it: these are part of the webbing and are necessary to help the webbing lock in the buckle. Most webbing has enough of these ridges - they are prominent enough, that the grip is OK. But sometimes the webbing can creep, and sometimes it does far more than that. They are two different cases - at least in theory.
In the case of creep, what is actually happening with your webbing is that it is moving in the buckle as you walk, and every little wiggle is letting the webbing creep slowly through the buckle. The movement may be only 0.1 mm each time, but that is enough to let the webbing creep. However, this does not always prove to be the real problem. It really only happens when the webbing is very smooth - which is not all that often.
The ridges on the webbing interact with the bars in the buckle. In an ideal case the edge or corner of the key bar will sit in between two ridges on the lower layer of webbing, and the tension in the upper layer of webbing will jam the lower layer hard against the corner of the bar. In the picture of the TriGlide you can just see thin ridges running across the top of the middle bar: they grip the webbing. In the TriGlide the key bar is not the obvious middle one but the edge of the lower one, which is out of sight. In the next photo below this edge is pointed to by the thin red line. Only on this edge are there two layers of webbing interacting. The tension put into the webbing by contact with this bar helps to amplify the friction of the webbing around the obvious middle bar.
To function, the buckle needs both the grip on the key edge and the friction around the middle bar. What happens if the key edge does not grip the webbing? There isn't enough friction around the middle bar, and the buckle slips.
This is where life gets interesting. The major buckle manufacturers of the West - ITW/Nexus, Duraflex, Ykk (and maybe others I do not know), understand this. They have been designing buckles for many years, and testing them. Usually their buckles work. But there are also some Chinese buckles on the market, and they often give problems. Some of the Chinese are just copy-cats (IP - what's that?), but others are licencees of Western companies. WooJin and UTX for instance are apparently licencees of Duraflex.
Why do the Chinese buckles often fail to grip? In some cases it is because the Chinese company has not understood how the buckle really works: the company has just copied (ripped off) the design. In other cases it almost seems that the company has deliberately attempted to 'improve' the western design, and thereby wrecked it. In one case the Chinese company rounded off the 'rough' square edges of the western design, making the buckle much easier to tighten. But the rounded corners meant that the webbing no longer gripped on the 'rough' edge of the key bar, and the buckles slips - at a measured rate of about 25 mm in 10 minutes on a shoulder strap while I was walking along.
There are several ways to solve this problem on your pack. The first one is to completely replace the slipping buckles with better ones, from one of the three companies named above. Frankly, I think this is the best option. If you don't want to do this, then you have to add some friction.
| 0. Replace the buckles completely, with good ones.
|
|
| 1. Replace the webbing. Good ribbed webbing takes a bend and has the ribs lock against the buckle edges. This may not be an option for you if you don't want to rebuild the straps on your pack, and if the buckles are the root of the problem it may not even solve it for you. I don't really recommend this option. | |
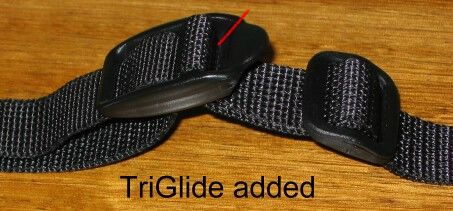
| 2. Anchor the webbing below the buckle with a TriGlide, thus
Now the webbing is held in one position with just enough force that it does not spring open in the LadderLock and creep. Alternately, you have added some more drag on the webbing so that it can grip around the middle bar of the triGlide. However, when this is done the adjustment becomes much more difficult: you have to create some slack, adjust the length, then tighten the webbing so there is no slack left. I have used this at times, and it does work, although it is a bit inconvenient. You can't adjust it while the pack is on your back. This method has the distinct merit that NO real changes are required to the pack at all, which meets your requirements if you are not sure about the following version. Me, I would only use it in emergencies, but it does work. |
 |
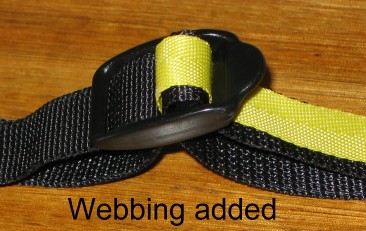
| 3. Alter the surface of the webbing to be softer and more ribby and to make it grip on the edge of the key bar: thus
Here I have put a second bit of yellow tape on top of the webbing already in place. The yellow tape would not actually be suitable as it is too thin and smooth, but the colour stands out for the photo. You should choose a soft webbing for this: nylon or polyester, but not polypropylene (most of the polypropylene stuff is too stiff). Pick a webbing which has a soft weave, preferably with distinct ribs across, and which has the same width as the original webbing. Be fussy with what you choose: there is no use buying something which is not going to work. Then sew it onto the original webbing, either to go on the outside of the webbing/buckle as shown, or on the inside, against the hidden key edge the webbing is wrapped around. The idea is to give the edges on the buckle something they can indent or bite into, which will provide the locking action to stop slip. This technique has the advantage that it leaves the strap fully adjustable, especially if the added webbing is on the outside as shown. |
 |
You can get webbing and TriGlides at good bushwalking shops, or at one of the American shops such as www.owfinc.com if really desperate. Make sure the webbing is fairly soft. The tubular webbing used for rock-climbing may be too thick for this. If buying replacement buckles, make sure they are one of the recommended brands, and are not labelled 'generic' (ie Chinese) in the catalog, and that they have the correct width. If buying TriGlides then generic brand ones should be OK. If sewing, use a heavy synthetic button thread rather than the light clothing thread. Remember: the added webbing must be well-secured to the original webbing.
© Roger Caffin 1/May/2002