
Send any comments to the maintainer Roger Caffin
All stoves have a flame: it's how they make heat. But what is a flame? In most cases, a substance will not burn with a flame unless it has been turned into a vapour (charcoal seems to be the most common exception). If something has a very low boiling point it is "volatile", and can be inflammable and dangerous. Unfortunately, we need fuels which can do this, especially in cold weather. However, some fuels seem to be more dangerous than others. We accept no responsibility for what you do with any fuels or stoves.
A stove burns a flammable material. Mistreat it and you can have a problem (as with my story about pancakes in the tent). Apart from that there are a few other precautions to be taken with stoves. We list some of them here:
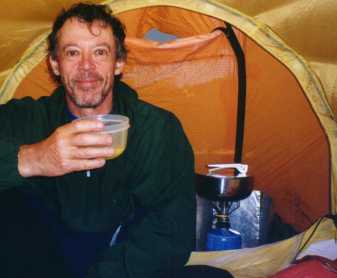
All the "good books" say to not use a stove anywhere in a tent because there is a danger of carbon monoxide (CO) poisoning. You also get this in the product warnings on most stoves, from the company lawyers. However, many of us do this all the time with no apparent ill-effect. The photo to the right was taken in bad weather in the Pyrenees: the steam and CO (and the CO2) went out the vent at the top. The hot soup was lovely, as was the rest of dinner - every night for 6 weeks. One has to wonder whether the whole thing is a myth perpetuated by companies who simply parrot what other company lawyers have said, or whether there is some substance to the idea.
On the negative side we do have a LOT of articles in journals such as the American Journal of Emergency Medicine and the Journal of Wilderness and Environmental Medicine about the hazards. It seems that some medics have nothing better to do than to bundle several quite unwitting volunteers and a couple of petrol or kero stoves into a sealed tent and see how long they can go before they cark it or the stove goes out. Seems rather unethical to me. However, before getting greatly worried about all these articles, please note two details. The first is that most of these 'experiments' have been run by medics with little or no apparent training in research: the experiments fall very much into the 'fancy that' category. They lack any form of experimental rigor - two subjects, one experiment, and few controls over the conditions, and they are generally solely concerned with what they saw happening - the CO concentration in the subject's blood went up to x ppm. None of them really address the question of why the CO was emitted. I guess the medics knew how to measure CO concentration in blood (they had an instrument to do that for them), but not how to study flame chemistry. Regardless, most of those papers are extremely poor work. One subsequent Letter to the Editor 'complimented' the authors of such a paper (using human volunteers!) thus: 'The authors are to be congratulated on managing to achieve CO levels of 350 to 500 ppm with one as high as 600 ppm. No previous tent or snow cave study has exceeded 300 ppm � the level thought necessary to cause collapse'. Such levels are known to be potentially lethal. Given the rest of that letter and that the author was a (very) senior medic in the Royal Navy, one suspects a heavy dose of incredulous and horrified sarcasm.
On the positive side we have the results of an experiment run by friends of Ed Huesers of IceTool fame. They fired up some stoves inside an igloo, with the door shut no less, and found little build-up of CO using a CO meter. But while their results were good, we have little knowledge of the actual operating conditions. Did they do something 'right' which kept the CO levels down? It would seem this is possible. It is also very likely that the cold snow they made their igloo out of was really quite porous and could let the CO leak out - this may not happen here in Australia though. We also have a page compiled by Zen Seeker on CO hazards from some of the research papers he amassed. It is extensive and recommended.
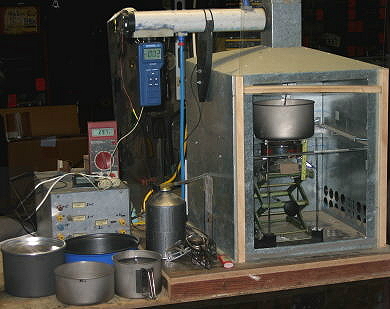
Recently the author has been conducting a major research project for Backpacking Light on the CO emissions from all sorts of stoves, published here, using the equipment shown here. A theory of why CO is emitted from some stoves but not others was developed and verified. The common factor in all stoves is that the fuel mixes with air and burns. One burn pathway is C + O => CO, CO + O => CO2. In the high temperature of a flame, the O2 is dissociated into oxygen (O) atoms and the hydrocarbon fuel into hydrogen (H) and carbon (C) atoms.) Given a chance the hydrocarbon will burn 'fully' to carbon dioxide (CO2) and water (H2O), and will make negligable amounts of carbon monoxide (CO). But if the flame is interrupted and cooled the combustion process may be incomplete, and CO may be allowed to remain. This is known as 'quenching', and this is where the danger lies. What can interrupt the combustion process? Anything which blocks and cools the flame itself - such as a cold pot sitting too low on the stove. Basically, if the pot is placed too close to the flame the combustion cycle can be quenched before all the CO in the flame is converted to CO2. A number of factors in the design of the burner on a gas stove the stoves were varied and the theory checked out. It was also found that some stoves with large surrounding metal trays under the burners can generate a lot of CO: the metal tray tends to block the airflow a bit. Different fuels were also tested, and it was found that petrol, kero and alcohol are all worse for CO emission than gas.
A small footnote here. If you can get the flame temperature up to 3000 C you might succeed in breaking some of the CO2 down to CO. But those sorts of temperatures are impossible with a stove running on air (rather than oxygen), so the possibility is purely academic. Add to that the fact that the author was measuring CO concentrations of the order of 5 ppm with good stoves. Forget it.
This author's research built on previous research done by another group, where they were able to get both high and low levels of CO from a small number of stoves, burning all major fuels (metho, shellite, gas), by varying the experimental set-up. Read the full article for more information. The authors of that research found that they could reduce the CO levels from dangerous to safe levels just by raising the pot about 20 mm above the pot supports on a couple of 'bad' stoves. They hypothesised that flame quenching was responsible. Another paper1, also from a member of the British military gives a similar explanation. Several authors have noted that any sign of an orange glow (which comes from hot carbon particles) might be a good indication that the burning process has been interrupted or 'quenched', and that CO may be left behind. One interesting source for this came originally from the Toyota Motor Company, and described the combustion process inside a car engine.
This author's research showed very clearly that increasing the clearance between the burner and the pot above what most manufacturers provided almost always reduced the CO production. Why have they provided inadequate clearance? Two possibilities present themselves: they never measured the actual CO production themselves, and they were more concerned about shaving seconds off the quoted boil time.
What this means is that any stove which has low burner-to-pot clearance may be dangerous. Some are infinitely more dangerous than others. It also means that running any stove flat out may be dangerous, if the increased fuel flow means the flames are longer, reach up to the pot, and get interrupted and cooled. However, a well designed stove should not suffer from this problem, at least at low altitudes. So not only is full-bore operation wasteful, but it could also be dangerous. On the other hand, cooks who always keep their (well chosen) stove turned down will generally be safe. Note: your pot will heat up quite happily by conduction from the hot air immediately above the flame: it does not need to be buried in the flame. In fact, having the pot in the flame just increases the chance of a burnt pot.
There have been suggestions that melting snow is more dangerous because the pot is so much colder. Let's do a reality check on this one. The flame temperature is going to be well above 1000 C, but let's use 1000 C in this case. Warm water might be at 30 C, while snow might be at -10 C. In one case the temperature differential is 970 C, while in the other case the differential is 1010 C. This is a difference of 40 C in 1000 C: about 0.4%. Come on guys: as far as the flame is concerned, there is no difference between the two!
The general finding is that gas stoves are safer than petrol or kero stoves, and that is before we consider fireball priming for petrol stoves. In fact, some well-known brands of liquid fuel stoves have been measured as being quite bad. We know that the heavier fuel molecules in petrol and kero need more oxygen and take longer to burn; inadequate fuel/air mixing may also make longer flames. This should be a consideration when you select your next stove.
Certainly, the results do mean that you need to make sure your stove has adequate airflow to the mixing region. A very large jet allowing excess fuel flow or very small airholes next to the jet limiting oxygen mixing are dangerous. If using a stove which has different jet sizes, make sure you use the right one - erring on the small side if you are not sure. If the flame is long it may reach up to the pot and be blocked: short flames are better for two reasons: they mean the flame won't reach the pot, and they also mean there is plenty of oxygen getting into the mix. You can of course decrease the flame length by reducing the fuel flow in many cases. But don't think this means you cannot have a windscreen around the stove. Some people (and companies) have claimed that it is dangerous to have more than two or three sides of the stove shielded. Come on: the stove needs some airflow, but not a howling gale! What matters most is the cross-section of the air-holes around the jet as they are usually the limiting factor. I normally leave a vertical 10 mm gap in the windshield with a gas stove, and that must be 100 times the cross-section of the air inlets in the burner. In the picture above the windshield is right open because I have just turned the stove off. Dinner is in the pot, but it is cooking in its own heat, and I wanted the stove to be visible in the picture.
This isn't the whole story of course. Make sure you read the section on overheating the canister before you install a windshield. Putting your stove outside the tent in the pouring rain isn't all that smart: trying to cook without getting wet arms will lead, sooner or later, to knocking the whole lot over. This could be just inconvenient, but it could also result in either you or your tent being burnt. Having the stove in the alcove or bell end of the tent with the door open at the top above the stove is a good compromise: just make sure there is plenty of ventilation and that the tent fabric is not too close above the stove. Coleman recommend on their latest multi-fuel stove that you have a vent of at least 10 square inches - that would be about 25 mm by 250 mm. This is not hard to achieve. In practice getting adequate ventilation may be the least of your worries during a storm!
Just when I thought carbon monoxide was the only hazard in the 'invisible' class, Glenn Horrocks sent the following to me. I have to say I have not actually run into the problem he describes, but that may be because I have never run a stove in a really enclosed space: it just didn't seem a wise move. On the other hand, my wife used to complain strongly about the pong of kero up the back of the tent when I was using a kero stove near the entrance. Maybe she was right.
You mention CO poisoning and cooking stoves on this page. I have heard some stories regarding CO and CO2 poisoning and cooking stoves, and in my humble opinion I think it is overlooking the real issue with poisoning from cooking stoves. I have no proof or experiments to justify my assertion, just a bit of knowledge of combustion physics and many years of use of my humble Whisperlite. I welcome any comments for or against!
I believe that the biggest issue with cooking with stoves in enclosed spaces is hydrocarbons, not CO or CO2. What's more, it is only an issue when the stove is turned off. When the stove is running it is fine. If you look at the design of the Whisperlite stove, the control valve is on top of the fuel bottle and is connected to the burner by approx 100mm of tubing. It is then heated to vapourise the fuel, mixed with air and burnt. When the burner is running there is no issue, the flame is running leaner than stoichiometric and hence essentially all fuel is burnt and almost no CO is produced. The poisoning issue is when the burner is turned off. You then have several millilitres of liquid fuel in the fuel line still under pressure. The flame goes out as there is not enough fuel to support the flame, so the liquid fuel then gets heated in the burner, evaporates and slowly escapes into the atmosphere unburnt. As the density of vapour is many times less than the liquid this small volume of liquid becomes a large volume of vapour and mixes with the air. The hydrocarbons in the air then cause the problem - essentially a weak form of petrol-sniffing.
I believe I have witnessed this occuring. I remember when I were a lad and my Whisperlite was new, my scout group was preparing for our first extended bushwalking trip, the Overland Track. As part of the preparation we decided to have a night practising preparing the types of food we would be eating on the track so we cooked in the scout hall using our camping stoves. We had all the windows in the hall shut as it was a cold winter night. While the meal was cooking there was no problem. When I turned my Whisperlite off, within a minute everybody in the hall was feeling drowsy and generally off-colour. We opened the windows, the air cleared and we rapidly recovered.
If my theory is correct, then this issue only affects liquid fueled stoves with a long distance between the control knob and where the fuel is vaporised. This would explain why you have not noticed it with your gas stoves.
I think Glenn makes a very good point here. Liquid fuel stoves always stink when you have turned them off. It is interesting that the latest stove from Primus, the Gravity MF, has a rotating connector at the fuel tank, and they recommend that you flip the tank upside down for a short while before you turn the stove off. This is to clear the fuel line of any fuel. Doing this will prevent the above problem.
I think it is quite reasonable to say that a gas cartridge (or a fuel tank, for that matter) will blow up if it gets too hot. But some people and some vendors carry this to a totally ridiculous extreme, claiming that you simply must not use any windshield around a gas stove at all. So I enquired about the safety standards required and got this answer from Coleman America. I also received similar answers from Primus. While it is written for the Powermax cartridges, I know that the DOT (US Dept of Transport) regulations apply to all small gas cartridges, with each brand having its own type-approval special conditions. However, the conditions are all rather similar.
In this context it is worth noting several things. The first is that a workshop compressor might reach about 80 - 100 psig, which is a long way below 285 psig. So we are talking about very high pressures here. The plastics used in stoves and in the Lindal valves in the cartridges all have quite good high temperature performance, and certainly work just fine up to boiling point (100 C). I have tested this. The regulations assume you can fill up the cartridges at 55 C. The regulations require that cartridges take a pressure which corresponds to a working temperature of 93 C, and testing to monitor this is required during production. Finally, we know that you can usually put your hand on metal up to about 45 C; much above that a reflex reaction sets in to make you say 'ouch' and withdraw. Fairly obviously, the 'ouch' temperature is a long way below the 93 C mentioned above, and probably below 55 C. So we can make a simple rule here:
If you can touch the cartridge without an 'ouch', it's safe.
I normally put a windscreen right around my upright gas stove, leaving only a very small (~10 mm) gap. If I am heating two cups of water in my kettle for tea or soup, the cartridge usually gets barely warm. Actually, I want it to get a little warm, to make sure the butane is well above its boiling point and evaporating along with the propane. So I don't put any radiation shield on it. What I always do is monitor the temperature of the cartridge and the behaviour of the stove all the time. This is hardly a problem as my attention is on the pot anyhow: I don't want my dinner burnt or the stove to fall over.
There is one place where interchangeability can be slightly hazardous, and that is with cartridges containing straight isobutane. This gas is in principle a perfectly valid alternative to the standard butane/propane mix. It comes in two different cartridge formats: one looks like a spray can, while the other looks like any other gas cartridge. Both of these cartridges have the standard Lindal valve screw thread fitting. The advantage of isobutane is that it boils midway between propane and butane (at -12C) and this means it can be very useful in the snow. However, I and several other walkers have found a small hazard with these.
The molecular weight of isobutane is pretty much the same as for ordinary butane, so it has about the same heat output. However, this gas has a lower boiling point and this means the internal gas pressure will be higher than for straight butane. (Actually, this gets a lot more complex: see Butane/Propane mixtures for more details.) A higher pressure means the gas comes out of the small jet inside the burner faster - unless the jet is smaller. It also means the gas velocity could be higher coming out of the top of the burner, and with those stoves having small burner areas and large jet sizes this can present a hazard. The gas/air mix does not seem to burn fast enough (the flame propagation velocity seems to be a bit lower), and at full throttle the flame can 'lift off' a small burner. This looks startling: the base of the flame literally rises above the burner, and is extremely dangerous! The flame can go out when you turn the stove up from low power, sending unburnt gas everywhere.
The author has had success with a straight isobutane cartridge on a SnowPeak stove with a small burner by restricting the air inlets a little bit and running the stove at a low rate. The idea was to reduce the overall gas/air flow rate out of the burner holes, so that it is below the speed at which the flame can travel. However, this idea is not recommended by the author or this web site. It can cause rather long tails on the flames if the air flow is restricted too much, and this can cause sooting of your pot. It is likely to present a carbon monoxide hazard in a confined space. Using the same isobutane cartridge on a burner with a large surface area did not seem to present any problem, which is consistent with the theory that the gas velocity is the critical element here. The larger the surface area of the burner, the lower the average gas velocity. This is one case where the manufacturers' bleating about 'use only our cartridges on our stoves' has some meaning, albeit in reverse of what they are saying.
Now, where this gets a bit strange is that I can't find these screw-valve canisters with straight isobutane any more. And yet, many of us were sure we had that problem. Were we mistaken, or were they taken off the market? It seems some (MSR) stoves do have the smaller jet suitable for the isobutane cartridge, and may also have larger burners. Conversely, putting an ordinary butane/propane cartridge on one of these MSR stoves may give a smaller gas flow and a smaller flame according to Roy Jamieson. I have not seen this problem myself, but this latter combination would be quite safe, and good for simmering stews.
Mention was made above of the cost of bushwalking stoves. They all have limited sales volumes and so are expensive - with one exception. This is the simple gas stove. There are many small cheap ($40-$55) gas burners for the screw-thread cartridges available from places like BBQ Galore and K-Mart. These work just as well as the expensive ($150-$300+) gas stoves sold in bushwalking shops. I know: I have used almost the entire range of gas stoves during product reviews. The cheap ones may sometimes be a little heavier, but the difference is small and they are very robust. I have used a cheap steel one on all our day walks for many, many years, with complete satisfaction (and fast cups of tea).
Also important is the cost of the fuel. This whole issue gets complex, depending on what you want, how often you wil use it, and so on. We have a separate Fuel Efficiency page just for this subject. But compare the cost of the fuel with the cost of car travel to the start of your walk.
Originally I thought that the jet size had to be bigger for kero than for petrol because the molecules went up in size and this would increase the viscosity of the gas. However, reader Murray Peake wrote to me to say that I had it back to front, and thatthe viscosity of the different vapours did not vary that much and that what counted was the density of the vapour. This triggered some research and a better understanding, for which my thanks to Murray.
If you think about it, the molecules are so much smaller than the jet hole that their sizes don't really matter. But as you go up from butane/propane to petrol to kero the number of carbon atoms in each molecule increases. This means the amount of oxygen required for combustion and the amount of heat given off per molecule of fuel increases. This means (in very simplified terms) that a volume of butane vapour requires far less oxygen than a volume of kero vapour for combustion. On the other hand, you always need high gas velocity to get good mixing of the fuel vapour with the air. So the kero jet has to be smaller to restrict the flow more to get the gas velocity higher to get more oxygen mixed in. By way of example, the Primus Omnifuel stove ships with three jet sizes: 0.28 mm for kero, 0.37 mm for petrol and 0.45 mm for butane/propane (thanks again to Murray for this data). Other Primus multi-fuel stoves (eg Gravity MF) also come with a range of jets of different sizes. In addition, you will find that many of the liquid fuel stoves come with warnings about not over-pumping the tanks: they do not want too much pressure.
One could go on to discuss burner theory, the distinction between a vortex burner (the noisy ones) and quiet burner (as in gas stoves), and the effect of the differing gas flame velocities on burner design. In fact, people who design very large gas and liquid fuel furnaces spend a lot of time thinking about this. My thanks to my friend RLT for a discourse on this. The next section will discuss that critical item 'flame velocity'.
Flame velocity only really matters with 'quiet' burners, be they gas or Shellite stoves. Normally the whole flame sits nicely on the burner in a pattern of blue mini-flames from the holes. However, with some stove/cartridge combinations one can see a rather frightening sight when the stove is turned right up: the flame starts to 'lift off' the face of the burner. If this goes too far the flame could actually 'blow out', and then you would an explosive air/gas mix filling whatever space is around your stove. Clearly, this would be very dangerous. What is going on here? We must delve deep into physical chemistry to understand this.
When fuel burns the energy from the combustion heats up the gas molecules and helps them dissociate. That is, the complex molcule breaks into singel atoms. This has to happen before the fuel can burn. Also, the atoms of oxygen in an oxygen molecule bonded to each other and they won't bond to something else while they are bonded to each other. Similar disassociation has to happen with the fuel molecules to separate the hydrogen and carbon atoms from each other. This disassociation takes time and energy: it does not happen at an infinite speed.
The end result of all this is that the flame front in an air/gas mixture travels at a finite speed. This can be called the 'maximum flame velocity'. (Slightly different terms may be used in some texts.) In a gas explosion, the high pressure created by the rise in temperature as some gas burns causes the flame front to travel *extremely* fast. In an oxy/acetylene flame, the flame velocity is also very fast. In both air/butane and air/propane mixes the maximum flame velocity is moderately low, around 44 cm/sec, while an air/isobutane mix has a slightly lower flame velocity of about 39.8 cm/sec (these are figures I have found on the web).
The gas coming out of the burner jet is travelling very fast. It drags air in from the air inlets (the large holes in the burner column beside the jet) as it shoots up into the burner head, and this air mixes with the fuel gas as it goes. Then the fuel/air mix comes out the small holes in the burner head. In fact, without this high velocity you would not get the air being dragged in through the air inlets, and the fuel could actually leak out of the air inlets. It is gas momentum which sucks air in the holes near the jet and out the holes in the burner head.
The holes on the face of the burner are deliberately kept very small to prevent the flame from getting inside the burner head - this principle was used by Davey in his early Miner's Lamp. Once outside the burner the fuel/air mix spreads outwards and slows down, and provided there is enough local heat energy to start breaking down the molecules, the mix burns. But it won't burn without an initial source of energy.
But if the fuel/air mix is travelling very fast at the exit holes in the burner face, the gas speed may be greater than the maximum flame velocity. The gas may fly away from the burner face faster than the flame can reach back towards the burner face. The gas will burn some distance away from the burner surface where the gas has spread out some more and the velocity has dropped below the maximum flame velocity. When this happens you have 'flame lift off'. Needless to say, things are getting a bit risky here as there is no guarantee of where the flame will be. In short, too high a pressure at the burner face can cause flame lift-off.
There is also a problem with a very low gas velocity or a very low flow. This leads to a very small flame. A very small flame can have a problem heating up the incoming gas enough, so the combustion can die. Also, the very low gas velocity means the flame can be blown around by a draft, and blown away. Once again we have a dangerous situation, but at a minimum flow rate.
If you look at a range of stoves you will realise that they sort of fall into two categories: those with little burners and those with big burners. This applies to both gas and Shellite stoves. The ones with big burners spread the gas out more and this leads overall to a lower gas velocity. Thus they can handle a bigger over-all gas flow, and can pump out more heat. However, they can be harder to turn right down as the larger area requires more flow to get above the minimum flow rate. On the other hand, the little burners are obviously more risky at high flow rates but they do generally allow you to turn the burner down to a lower setting. Designing a burner head to get fast boiling but gentle simmering is not that easy!
Given the above, is it possible to modify a burner to change its performance? The obvious answer is yes, but actually doing this in a safe manner is Quite Another Thing. I will describe some of the things I have done to illustrate the points made above, but please note I am not recommending that you do this: what you do is entirely your responsibility.
I had a large-area gas burner which suffered quite badly from flame lift-off. The obvious goal was to reduce the flame velocity at the burner face. Inspection of the many holes around the burner face showed they had been burnished over during the pressing operation used to shape the burner (made in China). I drilled out every hole to what seemed the original diameter (about 1.4 mm), and the flames now sat nicely on the face of the burner. There were a lot of holes ...
I did mention to the Australian supplier of this stove that the poor thing was underpowered and badly made. In fact, the specifications were for the low power rating. I got no reply. However, a year or two later the Australian company switched manufacturing factories in China, and the supposedly same model stoves from the new factory seem to have remedied all the faults I mentioned. And the quoted power output was double the old version two. Maybe, just maybe ...
I had another large-area table-top burner which burned nicely but also seemed pathetically under-powered. The flames were never very big. I decided there was not enough gas coming out of the jet. First I enlargened the jet from about 0.25 mm to 0.3 mm. (Drills of this size are very expensive, btw.) In doing this I had to be very careful to not damage the stainless steel 'final filter' just under the jet hole, inside the removable jet, and to get all the little bits of metal out. That operation seemed to get enough fuel coming out, but the flame was now lifting off badly. This was due to the significantly increased fuel/air mix which resulted. So then I drilled out all the holes in the burner face to 1.3 mm to reduce the gas velocity (they too had been burnished over during pressing of the burner head in the factory). That stopped the lift-off, but the flames were now dark blue and very high. Clearly not enough air was being pre-mixed around the jet before the burner face. So I enlargened the air inlet holes beside the jet. That changed the flame from long wavering dark blue to short light blue in a more compact pattern around the holes, but I now I could get lift-off at the far side of the burner head. (The jet was to one side rather than underneath in this stove.) So I enlargened all the burner holes another whisker, going from 1.3 mm to 1.4 mm. The end result was about double the output power without a lift-off hazard. However, it was a continuous balancing act between jet size, air flow and burner holes all the way.
Both of these are things are widely advertised. Only the windshields are worth using.
A windshield has several benefits: an enormous saving on fuel, faster cooking and greater safety. It does not have to be very complex or expensive - which may be why they aren't sold in shops. But making your own is so simple.

Basically, a wind shield should be a fence around your stove to deflect the wind from both the stove and the cooking pot. It should not totally enclose the stove: there must be room for air to get in. This air should not have to come down from the gap at the top; it should come from low down. You also need room to adjust the stove in many cases. There are two ways of doing this: leave the ends of the windshield open on the downwind side to make a vertical gap, or have holes around the base of the windshield. Some people claim the vertical gap should be on the upwind side rather than the downwind side, as the latter may actually suck air out from inside. Frankly, I think this is a silly idea and have never done that. Anyhow, the windshield should reach above the stove and about half-way up the side of the pot, depending on how you cook. If you are using a large pot, as is normal, there should be a clearance between the pot and the windshield of 15 - 20 mm. It isn't critical, provided the windshield doesn't mind getting hot.
What does the windshield really do? A technical answer follows. Heat transfer from the stove to the pot is by radiation from the flame and conduction from the hot gas to the pot exterior. The radiation isn't hugely significant with a typical blue stove flame (compared to a glowing bed of coals say), so it's conduction which does the work. You want that hot gas to cling to the side of the pot so the heat can transfer to the pot surface. If there is a wind blowing the flame sideways, all the upwind side of the pot is going to miss out on any heat transfer, and a lot of the hot gas on the downwind side is not going near the pot. The efficiency of heat transfer will drop alarmingly. In fact, many walkers have reported being unable to get a pot of water to boil when running a stove in a medium wind in the mountains. So the first thing the windshield does is to prevent the wind from blowing the hot gas away. The second thing the windshield can do, if it is fairly close to the pot, is to force more of the hot gas to flow past the wall of the pot. This increases the efficiency even more, and is a good reason why you should use the windshield even in a hut. Given this description of what's going on, you can see why the little so-called 'windshields' some burners (especially the cheaper steel gas ones) are supposed to have built into them will not be very effective. Actually, they are radiation shields - see below.
So the hot gases are going to flow up inside the windshield: this means that the windshield is going to get hot, even up around the top. This fact limits the materials you can use for it. Paper and plastic won't do, and Sisalation is not recommended, even the foil-coated version. I've tried it, and the corner kept burning ... Light aluminium sheet or heavy aluminium foil is excellent and common. Most mass-market stoves these days come with such a windshield, delivered as a folded strip of soft aluminium foil. You can also use very thin titanium or stainless steel foil, but getting those materials in small quantities is both difficult and expensive.
One word of caution is needed here. If you make the gap between the windshield and the pot too small and have a minimal gap between the ends of the windshield, you will be bottling up very hot air inside the windshield. This might or might not cause combustion problems (carbon monoxide), but will almost certainly transfer a lot of heat into the fuel tank or cartridge if it is inside the windshield, which could then get too hot. Things can then go bang. You must ensure this does not happen! To check this, touch the cartridge with your hand. If you can do this without an 'ouch' response, it's not too hot.
The biggest problem people encounter is finding a supply of suitable material at a reasonable price. There are three simple sources: aluminium dampcourse from a hardware shop, large heavy disposable baking dishes from supermarkets, and very thin aluminium sheet from some hardware stores. The dampcourse is moderately robust even if a bit heavy, but it comes in a large roll which costs a bit. If a group of you (or a club) can get together to buy a roll, this is viable. I have used it myself. The baking dishes are a cheap alternative: you buy one or two and cut them up and if necessary join several bits together somehow. They won't last all that long, but they are very cheap and light. The thin sheet aluminium is probably the best of the lot, but getting really thin hard sheet aluminium in the 0.3 - 0.5 mm range can be extremely difficult. Tooling foil may be suitable if you can find it, although it is rather soft. Recently I found some fairly thin stuff in small sheets at some large Bunnings (Australia) stores.

I have also seen common cooking foil folded up a couple of times to make a small windshield. It was for a small metho stove of the PepsiCan variety, and not very high, but it was awfully light (18 g)! Some of the vendors of metho stoves in America seem to be able to get hold of a much lighter fairly hard aluminium foil - I wish I knew where, as their low windscreens are all under 20 g. A firm called Trail Designs in America sells very light aluminium windscreen in 4", 6" and 8" heights through another lightweight firm called Anti Gravity Gear. These are lighter than what I can buy here in Australia. The Vari-Vent model has variable holes around the base which sounds good but was a but liable to tear in the field. The plain version works very well and has lasted me for many years. And finally, sometimes someone in America sells a very light titanium foil windscreen for a while, but these come and go rather quickly. That stuff is really thin and ultralight (7 g)!
There is an interesting alternate form of windshield and radiation shield all combined shown in an article "Homemade Canister Stove Windscreen" by Ryan Jordan (the editor) on BackpackingLight.com, again made from heavy aluminium foil. It seems more tuned for small one-man pots, but perhaps it could be adapted.
There are several sorts of radiation shields for different sorts of stoves. The cheap (steel) gas stoves often have one built-in: a sort of metal dish under the burner. They call it a 'windshield', but this is wrong. It is designed to block the heat radiation from the burner from hitting whatever is lower down on the stove. In the case of gas stoves this is mainly the gas cartridge, and their use is probably aimed at tourists. The concern is that the radiation can heat the cartridge to the point where the gas pressure in it rises and the stove starts to flare or roar - which gets ignored by the tourist. Some information on what temperature a gas cartridge can handle is found above.
The second reason for using a radiation shield is to protect the control handle or control knob. This can get very hot from the radiation, leading to damage if it is plastic and burnt fingers when you try to turn the flame down. The burnt fingers can of course lead to other more serious accidents too, when you miss turning the stove down, or send it flying in pain. I have had that problem once when I was misusing a stove as a toaster: there was a lot of glowing steel around.
A radiation shield can be a simple disk of aluminium foil with a small hole in the middle and a slit out to the side. When you assemble a gas stove you slip this disk over the column of the stove just above the cartridge. With other liquid fuel stoves you arrange the shield below the burner and the air inlet but above the controls, any fuel tank and any fuel hose - if possible.
Is a radiation shield needed? Not with a canister stove in my experience - provided you monitor the temperature of the canister with your finger. If you can put your hand on the top of the cartridge without it feeling uncomfortable (no 'ouch' response), the cartridge is not too hot. If the cartridge is getting close to being 'hot' and you have more cooking to do, you should open up the windshield and turn the stove down. I have not used one for over a decade. They are just extra weight.
There is an Optimus 8R stove which relies on the radiation from the burner to pressurise the petrol tank to drive the burner. There is a small radiation shield there to stop things getting out of hand - in theory. This shield does not always work however, as described in the pancake story.
It used to be that the only cooking pot you could find was an old jam tin. These days we have aluminium, stainless steel, and even titanium pots. And we have plain interiors, hard-anodised aluminium and non-stick (Teflon) interiors. What sort of pot should you use, and how should you use it? In the following sections we look at the physics behind pots - and you thought this was meant to be about bushwalking?

When looking at the efficiency of a stove, we have to include in our discussion not only the stove and the fuel but the size of the cooking pot which is being heated. We have to consider how the heat is transferred from the flames to this pot. Imagine that we have a little pot sitting on a great big roaring stove. Most of the heat is going to go straight up past the pot and be wasted. This is illustrated in the picture to the right of a metho stove running hard (courtesy of Zen Seeker). You can see the blue flames going up the sides. Now imagine a larger pot with a smaller flame. More of the flame will be hitting the pot, and so more of the available heat will get into the pot. So if you want greater efficiency, turn the stove down below 'flat out'. In fact, the stove usually has to be out before heat losses from a shiny sheltered pot become significant - provided you have a good lid on it. But make sure the flame does not have orange tips.
The possibilities of improving efficiency were brought home to me on one trip when I had miscalculated the amount of fuel needed. I had not taken enough fuel, and it looked as though we were going to be forced to cook over a wood fire (and mess up my nice shiny pot). However, I realised the problem early in the trip, and decided to try to stretch out what I had. I turned the stove right down for every meal: dinner took (maybe) an extra 5 minutes to cook. I let dinner cook with the stove off, rather than leaving it running low. But instead of using 40 g per day of gas, I found I was using about 25 g per day. Yes, we ate the same meals. So it can be done.

But there is still more to the efficiency of fuel use. Let's assume that what you are really doing is cooking dinner (rather than trying to run a physics class), and this means heating a pot of water. Obviously, if you are trying to fry something the following will be less relevant. While you are heating your pot of water up, the water is doing its best to cool down - by evaporation. This can be quite significant, and I have measured the rates of cooling under different conditions. The results of one experiment are shown to the right. The red line shows the rate of cooling of a shiny stainless steel 1.5 Litre pot of water that had a lid on it. There was some room for evaporation at the edges and through the hole in the lid where the thermometer went. The blue line shows the rate of cooling when everything else was the same but there was no lid. The horizontal axis is minutes; the vertical axis degrees Centigrade. Clearly, the escaping steam is cooling down the pot very significantly. If I really seal the pot up the rate of cooling is even less than this.
This has two consequences. The first is obvious: if you are cooking dinner without a lid on the pot you are going to be wasting a lot of fuel just to counter the effects of evaporation. You have to carry that fuel. The second consequence comes when you try to 'Dutch Oven' your dinner - that is bring it to the boil then let it sog for 5 - 10 minutes. For this to be successful the pot has to stay hot, and it is not going to do that for very long if evaporation is allowed. By taking just a little care with the lid on my pot, I regularly manage to Dutch Oven our dinners after about 15-30 seconds of boiling. The pot might cool down about 5 - 8 degrees in the 10 minutes needed: this is not a worry. (Food at 90 C is still far to hot to eat directly!) This saves a huge amount of fuel of course. It also means I have virtually no risk of burning the dinner.
Does which of the available metals you choose make a difference? Arguments rage: each has its advocates, although close examination of the arguments suggests each pushes a different advantage: weight, cost etc. Most of the arguments have one thing in common: a near-total ignorance of engineering facts. I am going to ignore the show-off factor here: if you want a bright red titanium pot, so be it.
Let us assume that you are going to heat one litre of water from 15 C to 95 C in six minutes. First we list the properties of four different metal pots. For the engineering purist let me add that I am making quite a few approximations here. For example, since I don't know exactly what alloy of stainless steel is used in pots, I cannot give its properties exactly. If you know better, let me know. I also list the properties of representative pots of each metal, as best as I have been able to ascertain them. I have used values from The Engineering Tool Box (thank you Stu for the corrections). (And I apologise about the mix of ISO and non-ISO units.)
| Metal | Density g/cc | Heat Cap J/kg-K | Thermal Cond W/m-K | Pot weight g | Wall Thick mm |
|---|---|---|---|---|---|
| Aluminium pot #1 | 2.7 | 910 | 222 | 250 | 1.5 |
| Aluminium pot #2 | 2.7 | 910 | 222 | 125 | 0.75 |
| Titanium pot | 4.5 | 540 | 19 | 140 | 0.5 |
| Stainless Steel pot | 7.7 | 490 | 12 | 195 | 0.4 |
| Water contents | 1.0 | 4180 | 1000 |
I must emphasise here that some of these parameters are rough. In particular, the wall thicknesses are very approximate. This is a pity, as it will turn out to be important. Some of the thermal properties of stainless steel are very suspect as they vary significantly with the alloy, but the figures are close enough.
First we work out how much energy (heat) will be required. We assume that the pots are all the same size and shape (most unlikely) and then work out the energy flux through the bottom of the pot to get this energy transfer in the six minutes allowed. From the flux and the pot thickness we can then work out the temperature gradient across the pot wall. That will tell us how each pot might behave. For this I am going to assume that the bottom of the pot is about 180 mm diameter: there are many pots of all three metals of about this size on the market. It's a good generous pot for two people. The area of the base will then be 25,447 mm2. I am also going to assume that the efficiency of heat transfer from the flame to the base of the pot is 100%. It will never be this high in practice (33% might be possible), but this really just means I am going to treat each pot the same. My calculations are as follows: feel free to correct me if I am wrong.
| Pot mass kg | Pot Heat J | Water heat J | Total Heat J | Power W | Gradient C | |
|---|---|---|---|---|---|---|
| Aluminium pot #1 | .25 | 18,200 | 334,400 | 352,600 | 979 | 0.26 |
| Aluminium pot #2 | .125 | 8,954 | 334,400 | 343,354 | 954 | 0.13 |
| Titanium pot | .14 | 6,048 | 334,400 | 340,448 | 946 | 0.96 |
| Stainless pot | .195 | 7,644 | 334,400 | 342,044 | 950 | 1.23 |
What does all this maths tell us? Several rather interesting things, as follows.
Clearly, the bottom line is that the power required for all pots is about the same. What pot you use is not really going to change how much fuel you need. Far more significant will be whether you use a windshield and a lid on your pot as these things can halve the amount of fuel you use.
However, this is not the whole story. In the field, as opposed to on the test bench, you wil find that these four pots have seriously different behaviours. Both stainless steel and titanium pots have a bit of a reputation for be able to burn your dinner. The problem is that the wall thickness is so small there is little chance for the heat to spread out sideways, and hot spots will occur. The aluminium pot #2 might be expected to have similar problems nto the Ti and SS, except that the vastly superior conductivity is going to help spread the heat much better. Mind you, the thicker aluminium pot #1 is going to spread the heat out even better still. My #1 pot has a Teflon coating inside, and it cooks wonderfully (and cleans with a rinse). This is yet another case where 'high tech' may not mean 'better', not withstanding the marketing hype. You might be well advised to make your buying decision on the quality of cooking rather than the high-tech wow factor (and Ti pots are awfully expensive!).
[Footnote, 2006: I have been advised by one major supplier of Ti cookware that they are seriously thinking of abandoning the Ti market: too dear and limited sales.]
Some interesting tests were reported to the author recently by Tony Beasley at the ANU. He had tried running this experiment with three real pots and a stove. He did his best to keep the stove rate constant for all three pots of course. The pots were all about the same size, but he found slightly different heating rates for each one. But when I looked more closely at the results and adjusted them for the small differences in pot cross section, the heating rates came out roughly the same - allowing for experimental error. I understand Tony is pursuing this work and will report again with more results.
Apart from the safety matters such as the radiation shield mentioned above, there are many tips for good stove use. In no particular order we have:
It is a good idea to do some maintenance on your stove. In fact, it is a good idea to know how to do maintenance on your stove. Practice at home beforehand is always better than discovering in failing light in the middle of a snow storm that you don't know how to fix your stove and you haven't the necessary tools either. There's a good article on this
A crucial component of both canister and liquid fuel stoves is the needle valve, also called the control valve. This serves not one but two functions. Obviously it serves to regulate the flow of fuel to the burner, allowing you to simmer gently or boil vogorously, but it also serves as a full shut-off valve. While most stoves use one valve for both functions, the wo functions are different. The Coleman Peak Apex II stove is a rare example of a stove which has a separate valve for each function.

Why is it important to recognise the difference between the two functions? Because you rely on the shut-off function to stop the flow of fuel completely, and this has to work perfectly or you will have fuel everywhere. Deadly stuff. But it doesn't matter if the control valve is a bit sloppy: all it has to do is limit the flow to some variable degree. This difference matters when you do maintenance on the valve. Damage the surface of the needle or the valve seat while cleaning and you may still get flow control, but the valve may not shut off completely any more. Get grit into the valve seat (dirty fuel, poor handling of the stove) and you can create a permanent leak.
With all that as a warning, let's look at when and why you might need to disassemble the valve for cleaning. The picture here shows the needle valve out of a Snow Peak GST100 canister stove. The parts are as follows.
The steeper shoulder labeled E is the bit which does the full shut-off. This must be kept smooth to work. The tapered needle bit at D is what varies the flow: if it is rough or scratched little harm is done - but don't damage it anyhow!
This valve was used under some very irregular conditions which arose out some experimental work. Several nearly empty gas canisters had been decanted into a single canister, and in fact too much fuel was put into that single canister so that it was nearly full. This is something you should not do of course. When this canister was used some liquid fuel was splashed up into the stove in the early stages, and this caused quite irregular burning. What had not been anticipated was that the little bits of fuel in the nearly empty canisters apparently contained a very high level of whatever trace odorant gas had been used - left over when the propane and butane had boiled off. When the fuel from these canisters was decanted into a single canister the result was a very high level of that 'trace' odorant liquid. When the liquid fuel bubbled up into the stove and expanded through the needle vale, the odorant gas collected at the needle valve. It may have interacted with the silicone lubricant on the O-rings as well - I am not sure. Anyhow, I ended up with a needle valve (and valve seat) with a certain amount of 'gunge' on it, and this made the valve a bit unreliable. Sometimes I had to open it a fair distance to get it to work - and then shut it back down quickly as it suddenly opened up too much. Cleaning was definitely in order.
I have also had a similar problem with an MSR WindPro stove I was using with the canister upside down. After a while it seemed that the valve was collecting some sort of gunge on it which had to be cleared by a full turn of the valve (in either direction). Otherwise the flame slowly died as the gunge built up right at the needle. Once again, cleaning of the valve was in order.
You can remove the needle valve itself on nearly every stove I have ever seen for cleaning. You should do once a year and make sure it is clean. Look into the valve seat with a strong light as well, and make sure that is clean. I recommend an ordinary tissue and a soft wooden match stick or toothpick for the cleaning. Once you have cleaned the needle valve and the cavity it goes into you should turn your attention to the O-rings. These should look smooth and not deformed. If they look damaged replace them: they can be bought from many gear shops as repair kits. Usually some silicone lubricant is included. Put a little smear of this on the O-rings and also a drop on the threads to lubricate them. Then reassemble gently. Then test the stove straight away, both for leaks at the valve spindle and for smooth operation. Never take an untested stove walking!
The other crucial component of both canister and liquid fuel stoves is the fine jet, just after the valve. If this gets even partly blocked you can have a lot of trouble. In the case of canister stoves you will rarely have any problems at all, but liquid fuel stoves can give some problems. In any case, cleaning the jets requires considerable care. You must never ever force anything into the jet which might change its shape or increase its size! If you carry a cleaning wire, make sure it is a loose fit inside the jet and has no burrs at the end!
Many canister stoves have a little bit of gauze mesh inside the jet - presumably to protect the jet from dirt. I have never had to clean a canister jet and I have never seen any dirt on the mesh.
Liquid fuels - petrol and kero, are a different matter. Have a look at any petrol or diesel engine, and you will see a 'final filter' just before the engine. The MSR International Shaker-jet stove comes with a built-in jet clearing wire, as does the venerable Optimas 8R. These fuels seem to have dirt in them sometimes. I used to filter the my kero using a chemistry lab filter, and I did find some dirt on the filter. However, this is not normally a huge problem compared to another source of dirt.
I once boiled a pot over on a kero stove. The boiling water hit the pre-heat tube which was glowing red hot. The thermal shock dislodged scale and tar from the inside of the pre-heat tube, which sailed down the tube to collect at the fuel jet, blocking it completely. No more flame! (No more dinner either.) Repair required a complete strip of the stove and a clean-out of the pre-heat tube and the jet. It took a while.
Another question often asked is how is how fast a stove works: how fast can a stove boil a litre of water? This seems to be a favourite "feature" advertised by most stove manufacturers. Well, fair question, but you shouldn't place much emphasis on it. It is mainly a marketing machismo thing, of little use in the bush. You might want a reasonable speed when making a cup of tea, but 30 seconds here or there simply don't matter. Enjoy the view. Of equal importance is the time it takes to set the stove up, to prime it if this is needed, to get it going smoothly, and whether you can turn it down to a simmer nicely. For detailed figures on all this see the Fuel Efficency page.
A bigger problem with the machismo trend is that many stove manufacturers make the jets just a little bigger than they should, to get that extra power. But this means that the air/fuel mix is usually a bit too rich, even at sea level, and the stove can emit a high level of carbon monoxide when run at high power. Needless to say, this is dangerous (ie potentially lethal). But trying to persuade manufacturers to not compete in the machismo race is probably futile.
A question often asked is how much fuel do you need. This depends a bit on how you cook, how much cooking you do, what fuel you are using, and whether you have to melt snow. For two people in summer, with a cup of tea in the morning and dinner of soup and a main course at night, I found about 60 - 70 mL (~50 gm) of petrol or kero per day to be sufficient, while about 30 gms of gas was enough. If you are using metho, double the Shellite quantities at least, and have some spare. In winter in the snow those figures need to go up for several reasons. The water is colder to start with (but this is a relatively small effect) and you may want more hot drinks. As well, you need a safety margin for melting snow - which can take double the amount of fuel. These figures assumes you are using the fuel-saving tricks mentioned above - but eating fairly well. We were using about 30 - 35 g of gas for two people per day while ski-touring without melting snow; but I would normally carry a 50% safety margin in the snow just in case.
Why do the different fuels need different amounts per day? There is an extensive discussion of this in the Fuel Efficency page. Probably the biggest factor is that priming petrol and kero stoves and warming them up uses a lot of fuel, while gas needs none of that. Metho stoves also use a bit of fuel before they get going, and the fuel is just basically inefficient.
One of the more fun things about liquid fuels is trying to work out what the fuel you want is called in the country you are in. For reasons associated with Murphy, there are real traps for the unwary here. In fact, the situation is so bad there are even web sites dedicated to listing the names of fuels in all languages and countries! In case you can't reach that URL a copy has been put on this web site here, but it has not been updated since May 2003.
Part of the problem is that even kero is a complex mix, containing paraffins, iso-paraffins, olefins, napthalenes and aromatics. To illustrate the problem, Coleman classify their 'Coleman fuel', which is designed for what we call 'petrol' stoves, as 'A light petroleum naptha ... paraffinic in type'. Figure that one out. That said, it is a little different from even additive-free petrol. The latter is 'designed' to work in petrol engines, after all. Finally, are you thinking that at least alcohol should be straight-forward? Nope: here in Australia we have simple metho, but in America they have methyl alcohol, ethyl alcohol, and several derivatives. It's worth noting that methyl alcohol is rather toxic. It's also worth noting that while 'methylated spirits' is a tightly-controlled and safe fuel in Australia, in America there are no restrictions on what they can put in it. Some of the chemicals found in commercial 'metho' in America are quite toxic; others are worse.
Optimus in Sweden have a good FAQ page on fuel, mainly of the petrol class. They do focus on safety and emphasise the reasons for not using automotive petrol per se. Mostly, it's your health at risk.
A very common FAQ concerns taking stoves on a plane. You can understand that the airlines are a little concerned about this. The general rule to remember is that any container which has fuel in it is banned by air safety regulations (at least locally and right now). This includes gas cartridges of course. You run a significant risk of losing all fuel containers, empty or full, regardless of their state, if they have any detectable traces of fuel. Not always, just sometimes, and unpredictably. Liquid fuel (Shellite) cigarette lighters are also banned, but the small butane lighters seem to pass through sometimes. This is strange, because I could make a very effective fuel/air bomb in a plane with one of those. Of course, bottles of high-proof vodka sold by the airline staff during the flight do not count - odd about that.
Interestingly enough, airline staff seem to focus on the fuel tanks, not on the stove. So if your stove has a separate tank the stove may get ignored while the fuel tank is confiscated - with pump. The reason is probably the far smaller volume involved in the stove itself. Of course, there is going to be trouble if the stove smells of fuel! On the other hand, gas stoves by themselves don't present any problem at all.
Some people have tried filling their fuel tank and bottles with water and labelling them clearly as water bottles. It may work, or it may not. Your problems here are the risk of loss and clearing the water out afterwards. Water and petrol (or kero) do not mix, and a few drops of water can play havoc with stove operation. Water left there too long can also cause a lot of corrosion, which is really bad news for the fine jet in the stove. However, you can wash any traces of water out with metho: water will dissolve in that. Then let the traces of metho evaporate.
However, there is progress. The IATA rules about the transport of bushwalking stoves were changed in 2003. Our attention was drawn to this by "PeteM"
Significant Changes to the 44th Edition (2003) IATA Dangerous Goods Regulations
Section 2 - Limitations
Three new items have been added to the list of articles and substances acceptable for carriage by passengers and crew (Section 2.3 and Table 2.3.A). These are:
With operator approval in checked baggage only
* Liquid fuelled camping stoves - Provided that steps have been taken to nullify the hazard by draining and air-drying the fuel container, or rinsing the fuel container with cooking oil to raise the flash point, then wrapping the fuel container in absorbent material and placed in a polyethylene or equivalent bag.
Where the liquid-fuelled camping stove is prepared in this manner it can be classified as non-hazardous.
Of course, at present this does not cover the gas cartridges for our gas stoves, which is a pity, but at least we have some progress. I gather (2004) that these rules changes are being accepted by the airlines, although it may help to carry a printed copy of the regulations with you just in case.

1 "Carbon Monoxide Poisoning in Tents - A Review" Simon Leigh-Smith, MBChB, MRCGp, FRCSEd (A&E), Defence Medical Services, UK.
© Roger Caffin 1/3/2002, 20/4/2013